So, have you decided to take the plunge and set your business up with a Twitter account?
Great! Here are step-by-step directions on how to create an account using your computer. (Twitter is also accessible via a mobile app for iOS and Android or through a mobile browser, but the steps will vary from what's listed here with a mobile device.)
1. First, visit twitter.com from your computer.
Under “Join Twitter Today” enter an email address and a password, then click "Get Started." You can use a business or personal email address. However, if you plan to have anyone help you with your Twitter marketing strategy, the account will be shared. Keep that in mind when creating a password.

2. You will then add in a full name.
For a Business, you will want to put your Business Name.
3. Twitter will then ask for your phone number. We recommend providing your phone number to keep your account secure or in case you get locked out, but you can also hit “skip".
4. You will then have to choose a unique username that's not already in use on Twitter.
We recommend keeping it close to your location name--if possible--but you may have to add something to it if your business name is already in use.
i.e. “Tom’s Bar” may have to use @TomsBarSavanna instead of just @TomsBar which is most likely already taken. You have 15 characters to work with, so it may take some time to experiment with what looks the best but also still fits. Remember, you don't want to stray too far from your business name or else it might be hard for your customers to find you.
5. Customize Your Account
Once you’ve passed the beginning questions, Twitter will try to start customizing your account. First, it asks you what topics you’re interested in. Feel free to choose a few or skip altogether. With a business account, this is completely optional. Click Continue to go to the next step.

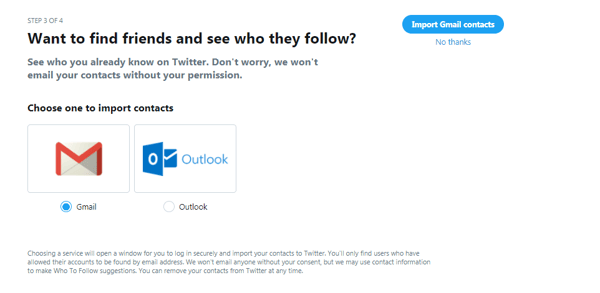
6. Sync Your Contacts
Twitter will ask you to sync your contacts. Go ahead and import your contacts or click “No Thanks”. Since this is your business account, there’s no reason to sync your contacts unless you want your phone contacts to know about your new Twitter account.

7. Fill In Your Profile
This is Twitter’s “final step” to make the account official. Technically, you can stop here and tweet away, but we recommend continuing on to fill your profile in and really make your page stand out. To make your profile complete, you want to add a bit more detail. Twitter will prompt you to complete your profile by adding a profile photo. Use a logo, if you have one, otherwise use a relevant photo of your business. You also want to add an introduction about your business. Add a short description of what your business is about, include anything about your location that is unique or that customers enjoy.


Congratulations! You now have a Twitter account for your business.
Now start tweeting! If you want to learn about the basics of tweeting, check out Twitter's Guide to Getting Started


_121_Full%20Color_ON%20BLACK-01.png?width=267&name=AE_MultiLogo(H)_121_Full%20Color_ON%20BLACK-01.png)
